

How to Code a VEX IQ Catapult: Single-Button Launch & Auto-Reload
Wednesday, November 11, 2026
In competitive robotics, every second of a 60-second driver-controlled match counts. If a driver has to press one button to launch, hold down another button to reset the mechanism, and manually watch for the arm to return to position, they lose valuable seconds and mental bandwidth that should be spent navigating the field and lining up the next score.
The solution is simple: automate the cycle into a single button press.
By chaining the launch, delay, reload, and stop commands together, your driver can tap one button once, keep driving immediately, and let the code handle the mechanical timing in the background.
Step 1: Unbind Default Controller Actions
Before writing custom automation code in VEXcode IQ, you must disconnect the motor from direct controller stick or bumper assignments.
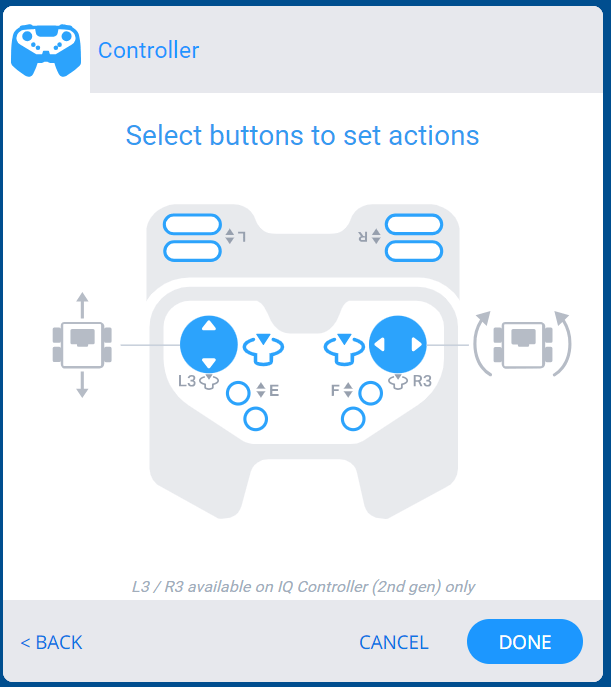
- Open the Devices window in VEXcode.
- Select your Controller.
- Locate the buttons currently assigned to your catapult or slingshot motor and click through until the button assignment is cleared (blank).
- Click Done.
Step 2: Set the Trigger Event
Decide which controller button makes the most ergonomic sense for launching. The right bumper (R Up) is typically ideal because it leaves your thumbs free on the joysticks while your index finger fires.
Start your stack with an event block:
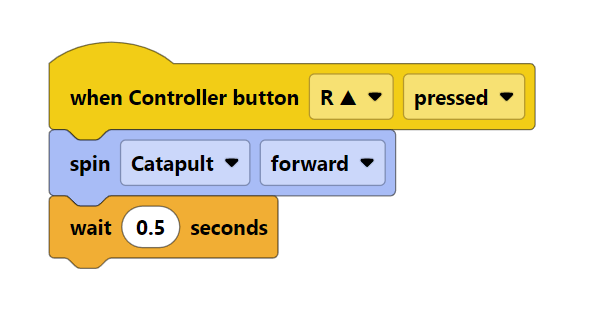
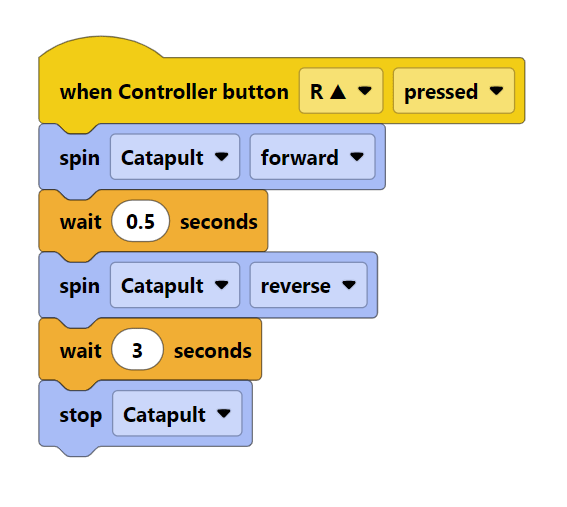
- Drag out: when Controller RUp pressed (or select a different trigger)
Step 3: Spin to Shoot (The Release)
Once triggered, the motor needs to turn just long enough to slip the gear, release the cam, or trip the release latch.
- Add: spin [Catapult] forward
- Add: wait (0.5) seconds
For most geared catapult and slingshot mechanisms, half a second provides ample rotation to trigger the release mechanism cleanly without over-straining the motor.
Step 4: Automate the Reload Sequence
Immediately after the shot releases, the catapult arm must be drawn back down into firing position so it is ready for the next game piece.
- Add: spin [Catapult] reverse
- Add: wait [3.0] seconds (You can adjust this number)
- Add: stop [Catapult]
The 3-second wait gives the motor enough time to wind back against the rubber bands or tension cables until it reaches the primed holding position. Stopping the motor at the end prevents motor burnout and preserves battery life.
Step 5: Test & Tune Your Timings
Every robot build features slightly different gear ratios, friction points, and rubber band tensions. Once you download the program to your brain, run a few bench tests:
- If the catapult doesn't fully release: Increase the launch wait time from 0.5 seconds to 0.7 seconds in small increments.
- If the catapult doesn't pull all the way back: Increase the reload duration from 3.0 until it securely latches.
- If the motor whines or stalls after reaching the bottom: Decrease the reload wait to less than 3.0 sec so the motor stops shortly after the catapult reaches the bottom.
Coding a full robot?

Ben Lipper
Teacher, Robot designer, and always an engineer at heart
I've been in competitive robotics since 2015.
Today I work with robotics coaches to get their teams unstuck so they can build world-class robots while the kids have a total blast doing it
Build robots the easy way!
In this course, I show you the detailed process that I used to design and build each robot on my channel
Not ready to sign up?
Learn more